This tutorial will take you through deploying and testing your smart contract on a local, private blockchain you created using Geth.
Why would we want to publish a smart contract to a private, local chain? Mostly for testing purposes. This is how we can test contracts locally without publishing it on a larger network for everyone to see. And, it’s free to do, since we can allocate as much ether as we want to accounts we own through our genesis state file.
If you find this post useful, I encourage you to follow my Twitter account, where I post Ethereum and blockchain-based content, tutorials, and low-level explanations.
Testing Smart Contracts Locally using Geth https://t.co/P0vxqY6Znt
— Brandon Arvanaghi (@arvanaghi) February 15, 2018
Prerequisites
1) Install Solidity
Solidity is a contract-oriented, high-level language for implementing smart contracts. Here is how you can install it.
2) You’ll need to set up a private Ethereum blockchain using Geth.
This entire tutorial is based on your successful completion of #2.
Contract to compile
We will be using the Greeter.sol contract from ethereum.org. It sends you a message, and you can change that message if you’re the contract owner.
// Greeter.sol
contract mortal {
    /* Define variable owner of the type address */
    address owner;

    /* This function is executed at initialization and sets the owner of the contract */
    function mortal() { owner = msg.sender; }

    /* Function to recover the funds on the contract */
    function kill() { if (msg.sender == owner) selfdestruct(owner); }
}

contract greeter is mortal {
    /* Define variable greeting of the type string */
    string greeting;

    /* This runs when the contract is executed */
    function greeter(string _greeting) public {
        greeting = _greeting;
    }

    /* Main function */
    function greet() constant returns (string) {
        return greeting;
    }
}
Once you have that in a Greeter.sol file, do the following from a Terminal window:
arvanaghi> solc -o target --bin --abi Greeter.sol
As explained in ethereum.org, this generates a target directory containing:
- Greeter.abi
- Greeter.bin
- Mortal.abi
- Mortal.bin
If you notice in the contract code for greeter contract, we see “contract greeter is mortal {”
This means that the greeter contract inherits all the functions and variables from the mortal contract, so the resulting Greeter.abi and Greeter.bin contain all the code we need. You might as well discard Mortal.abi and Mortal.bin, since their data are already contained in the Greeter files.
Greeter.bin
The Greeter.bin file contains the compiled Greeter contract. If, from Terminal, you do cat Greeter.bin, you will see a bunch of hexadecimal values. This file’s contents are what get placed on the Ethereum blockchain. All the executable code needed for the Ethereum Virtual Machine to interpret exists in this file.
Greeter.abi
ABI stands for Applicaiton Binary Interface. It’s a way to interact with the hexadecimal output from the Greeter.bin (which will be the binary data stored on the blockchain) in a human-readable way.
If you do cat Greeter.abi from Terminal, you’ll see something human-readable, since by convention Ethereum clients and compilers use JSON to represent the data.
arvanaghi> cat Greeter.abi
[{"constant":false,"inputs":[],"name":"kill","outputs":[],"payable":false ... ]
The ABI produced for the contract needs to have all the relevant details about each function, variable, and their attributes. If there is a mismatch in what the ABI says about a function or variable with what the compiled contract code says (for example, your ABI says a function accepts a string as an argument, but the compiled code expects an uint), then that interaction you do with the published contract through the ABI will fail.
The compiled contract code is the truth. The ABI is an abstraction to make interacting with it easier.
Writing contract to your private chain
Make sure you have set up a private Ethereum blockchain using Geth. The following steps all take place from the console running from Node 1 in that post.
Storing the bytecode
When we publish the contract to our private blockchain, we’re actually publishing the compiled bytecode (the contents of the Greeter.bin file), since that’s what the EVM knows how to interpret. We’re going to create a variable in our Geth console to store the contents of the Greeter.bin file.
Since the data in Greeter.bin is encoded in hexadecimal, we must manually add “0x” to the beginning of the variable we create to tell the EVM that we are providing it hexadecimal. Copy and paste the contents of Greeter.bin into a new greeterHex variable like so:
// From Node 1's Geth console
> greeterHex = "0x<copy and paste the contents of Greeter.bin here>"
You can test that the variable stored the contract data properly by entering greeterHex into the console again.
Storing the ABI
The bytecode we just stored in a variable is the code that will actually live on the blockchain. It’s also how all commands we send to the contract will get interpreted. Because we’re humans, not robots, we use the ABI to make our lives easier. Specifically, without an ABI, we would have to interact with the smart contract’s functions by knowing the hexadecimal encoding of those functions and what they mean.
Let’s store the contents of greeter.abi in a variable like so (truncated output):
// From Node 1's Geth console
> greeterAbi = [{"constant":false,"inputs":[],"name":"kill","outputs":[] ... ]
If formatted properly, Geth will interpret the data you provided it as JSON, and present it back to you:
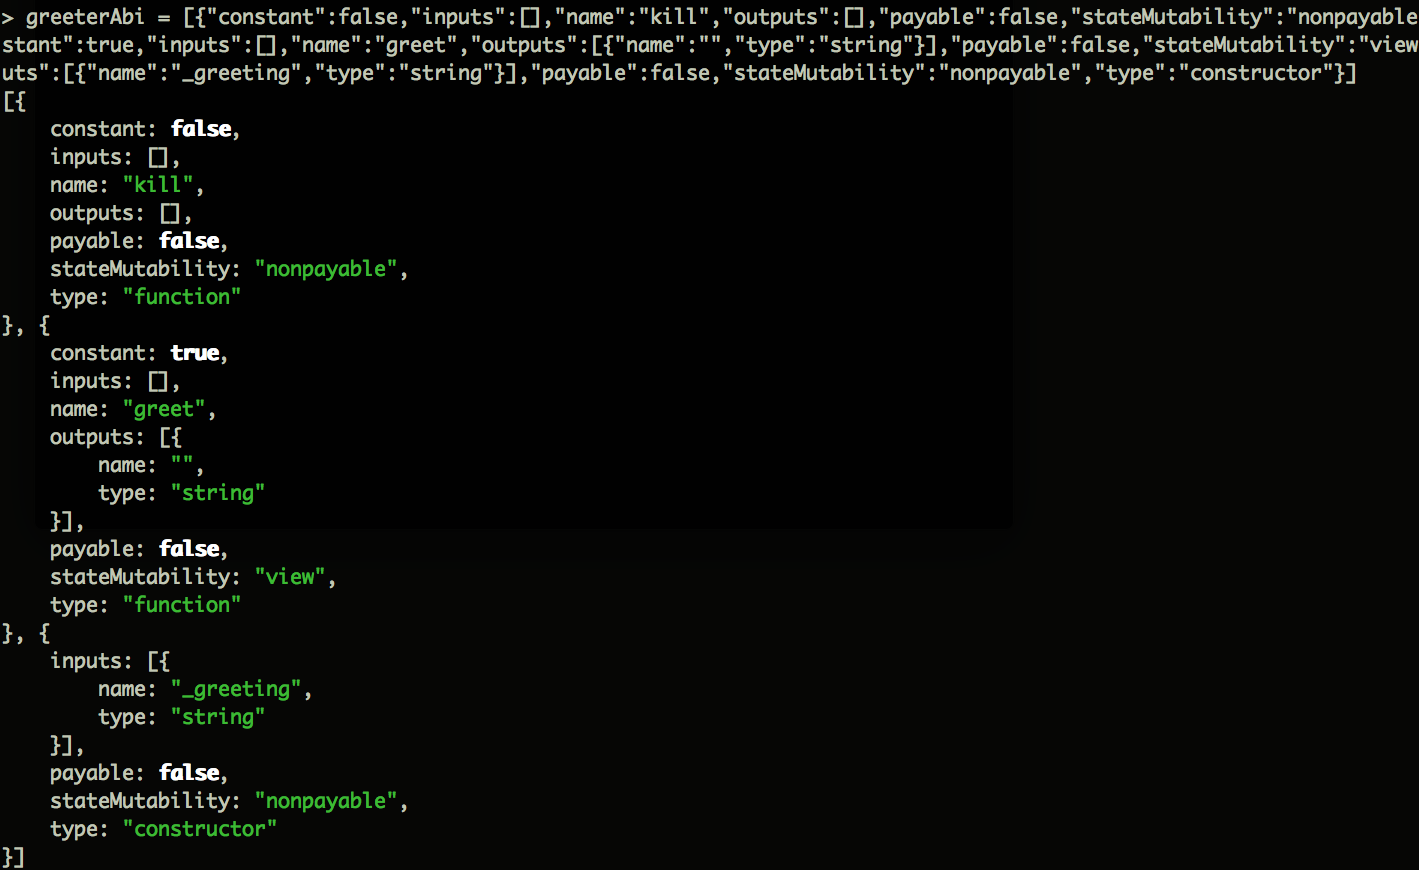
Right now, Geth only knows that the data you provided it was properly-formatted JSON. It does not know to treat it as an ABI for a contract you will be publishing shortly.
To make Geth aware that the JSON in our variable is to be trated as an ABI, we do the following:
// From Node 1's Geth console
> greeterInterface = eth.contract(greeterAbi)
What eth.contract() does is treat the JSON passed into it as an ABI for a contract. This means that if we now did greeterInterface.greet() (after having published the contract to the blockchain), Geth would know that greeterInterface is a means of creating the corresponding bytecode needed for calling the greet() function on the contract.
Publishing the contract
Now that we have our variables defined, it’s time to publish our contract to our local blockchain.
Here is the command to publish the contract, slightly modified from what we see in Geth’s contract tutorial. Further documentation can be found here.
var greeterTx = greeterInterface.new(
  "This is the greeting with which we will instantiate the contract. Hi!",
  {
    from: eth.accounts[0],
    data: greeterHex,
    gas: 1000000
  }
)
If you get an error during this step about needing to unlock your account, do personal.unlockAccount(eth.accounts[0]) and enter your passphrase.
Once you have completed this step, you should get something like this:
INFO [MM-DD|HH:MM:SS] Submitted contract creation              fullhash=0x830e6922af10081455de296683d959dde01588473326db251116ab72c99ec426
contract=0xA94C943B7b1Fe87E0b061109411Cde360454453C
undefined
You have sent the transaction to the network. Since we haven’t mined it yet, it’s not useable, because it’s still sitting in the transaction pool on miners’ systems. However, we can see it sitting in the transaction pool from any node to which we just broadcasted.
An important point: though the contract has yet to be mined, its a address that you see above will be the exact same once it is on the blockchain. The contract address is generated in part by the address that created it, as well as a nonce. Thus, when the contract is actually on the blockchain, any node that wants to interact with the contract will be using that very address Geth just provided us.
The fullhash value above is the transaction hash, or how we can track our transaction on everyone’s nodes. Using something like Etherscan and feeding it this hash value will allow you to see the status of your transaction.
We can store this transaction hash in a variable without having to copy and paste by doing the following from Node 1:
> greeterTxHash = greeterTx.transactionHash
As I mentioned, this transaction also exists on Node 2 (since we published it), but does not yet exist on either Node’s blockchain. It is in the transaction pool for both.
Run the following from either Node to see the “pending” transaction:
> txpool.status
You will see 1 “pending” transaction in both Nodes’ pools. For a more detailed view, enter txpool by itself.
If we wanted to see a transaction receipt, it would not exist yet:
> eth.getTransactionReceipt(greeterTxHash)
null
A transaction receipt gets created once the transaction has actually been mined into a valid block and accepted by the network.
Mine the contract
From either node, run miner.start(), and then after a couple seconds run miner.stop().
Now, our contract should be published. Try the same eth.getTransactionReceipt(greeterTxHash) command again, and you will get a receipt.
As a reminder, the address of the published contract will be the same as the address Geth gave us when we created the contract in the first place. Another way to recover this address is by running the following command from Node 1:
publishedGreeterAddr = eth.getTransactionReceipt(greeterTxHash).contractAddress
Now, we use the interface we created earlier from the ABI and link it with the published contract:
> greeterInterface.at(publishedGreeterAddr).greet()
"This is the greeting with which we will instantiate the contract. Hi!"
To see it working on Node 2, you’ll need the published contract’s address and its ABI. In one swoop, you can do it all like so:
// From Node 2
> greeterAbi = <paste greeter.abi file contents here>
> greeterInterface = eth.contract(greeterAbi)
> publishedGreeterAddr = <paste address stored inpublishedGreeterAddr from Node 1 here>
> greeter = greeterInterface.at(publishedGreeterAddr)
> greeter.greet()
"This is the greeting with which we will instantiate the contract. Hi!"
Again, the ABI can be linked to any contract on your local node, but the resulting bytecode you send to that contract on the blockchain will be malformed and thus rejected unless you actually have the correct ABI for the contract with which you want to interact.
For more Ethereum and blockchain-security posts, follow @arvanaghi on Twitter.